using c# and vb in the same web project
0Can you have both c# and visual basic in the same web site project?
Definitely! It simply wouldn’t make sense from a new project standpoint, code reviews, coding standards, continuity, project maintenance, etc.
however, people still want it. to-date i never really tried (and that’s been my answer). I was presented with a usable scenario of why you may need (not want, need) to do this, so I finally tried it. the answer: yes…kinda…sometimes.
let’s assume we have a web site structure like this:
we have the App_Code folder and a .cs and a .vb file in the same projects (separated into sub-folders). note that the project sees them as folders (yellow folder icon) in the special folder. each class within there basically has a “hello world” function only, like this in the c# file:
public string SayHelloCS()
    {
      return "Hello from CS";
  }
and the visual basic file has a similar function emitting "Hello from VB."
now, if you run default.aspx in this structure, this is what you will see:
The files ‘/WebSite5/App_Code/VBCode/Class2.vb’ and ‘/WebSite5/App_Code/CSCode/Class1.cs’ use a different language, which is not allowed since they need to be compiled together.
interesting? probably not, but it makes sense…so how do we overcome. we use a configuration option called codeSubDirectories. here’s what we need to add to our <compilation> node in our web.config:
<compilation debug="false">
          <codeSubDirectories>
            <add directoryName="VBCode"/>
            <add directoryName="CSCode"/>
          </codeSubDirectories>
       </compilation>
once we add those codeSubDirectory nodes, let’s “look” at what the project structure looks like now:
as you can see the code folders are now “special” in the eyes of visual studio. now if we browse default.aspx we will see:
Hello world from CS. Hello world from VBCustom error pages using .htaccess
0We’ve all seen the dreaded Error 404 message – the result of broken links and mistyped URLs. You’ve probably been on some websites where the error pages are customised with their own logo and message, and I’m sure you’ll agree that it looks far more professional than the standard one.
In this article we’ll show you how to use Apache’s .htaccess file to make your own customised error 404 pages.
Create a new text file on your computer, and call it “htaccess.txt”. Enter the following lines:
<Files .htaccess>

order allow,deny

deny from all

</Files>
Now you need to create the 404 page. Make a new web page called “error404.htm” and enter “This is my 404 page”. Enter it a few dozen times, as Internet Explorer won’t display it unless the file is over 512 bytes.
Once it’s done, login to your webspace with your FTP client, and create a new folder called “errordocs”. Upload the file “error404.htm” to this directory. Upload “htaccess.txt” to the root of your webspace and rename it to “.htaccess” — there’s no .txt at the end, no name in front, just “.htaccess”. If the file seems to vanish don’t worry, some FTP clients don’t display it — the file’s still there.
ErrorDocument 404 /errordocs/error404.htm
The first part stops people viewing your .htaccess file. The second part tells Apache to redirect any 404 errors to the file “error404.htm”.
Split Command Sample Code (VB NET)
0Preparations : 1 Textbox and 1 Button
Code :
Private Sub Button1_Click(ByVal sender As System.Object, ByVal e As System.EventArgs) Handles Button1.Click

    Dim strInput As Array 'make array variable

    Dim strResult1 As String 'text variable

    Dim strResult2 As String 'another text variable

    Try

    strInput = Split(TextBox1.Text, " ")

    'split the textbox if there is space.

    'you can also use chr(32) to replace " "

    strResult1 = strInput(0) 'split first text

    strResult2 = strInput(1) 'split second text

    MsgBox(strResult1 + strResult2)

    'combine first and second text with no space

    Catch ex As Exception

    End Try

    End Sub
Test the code, type space character between 2 words :
What we have done here?
Explanation :
- We have 2 words with a space character (“jenni” and “fer”)
- We split those words using “Split” command into array, the process is identified with space character, so we had 2 lines.
- We combine those words back together in one line, but this time with no space character in it.
Getting IP Address (VB NET 2008)
0Note: if you’re not a beginner and just want to look for the code, you may skip these 1-6 steps and go straight to the sample code.
1) Let’s start with new project “Windows forms application”

2) Put one TextBox and a Button in the Form

3) Add reference to our project by clicking : Project –> Add Reference

4) Scroll down and select “System.Net” as our reference. Click OK to proceed.

5) Open the Coding Window or you can just simply double click on the Button1, or you can also use F7 for shortcut.

6) Type “Imports System.Net” in General as shown in the picture below

7) Now the code part, on your Button1_Click event add this code as shown in the picture below

8) Run your program or press F5
Access Database Connection (OLEDB) – VB NET 2008
0Here, I will show you how to make a connection to MS Access 2007 database with VB NET 2008 using wizard. If you’re looking for the sample using code, then this is not what you’re looking for.
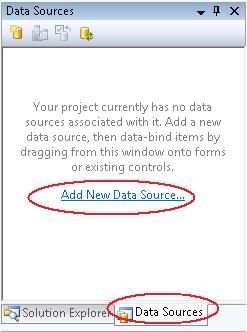
1) Start with NEW windows form projec. When new project has been created, click the “Data Source” tab and choose “Add New Data Source”
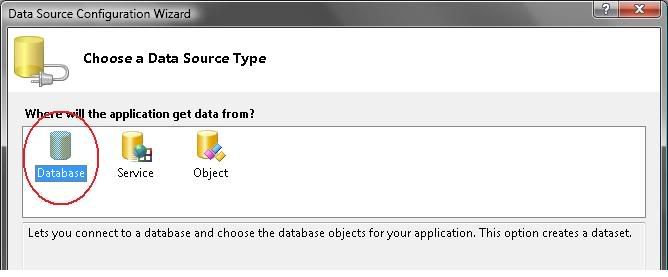
2) Choose “Database” and then click OK
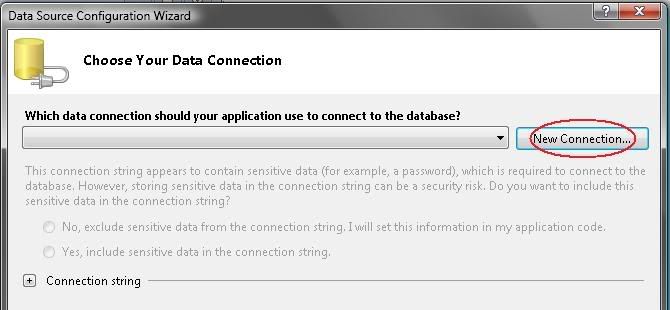
3) Click “New Connection”
4) on Default, the connection is set to SQL, to make database connection using Access then you need to change it as in the picture below.
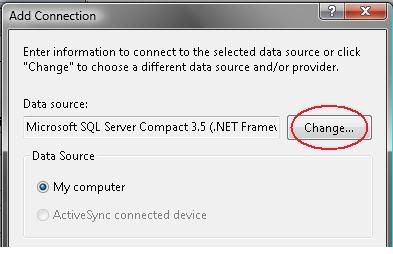
5) Select “Microsoft Access Database File” then click OK.
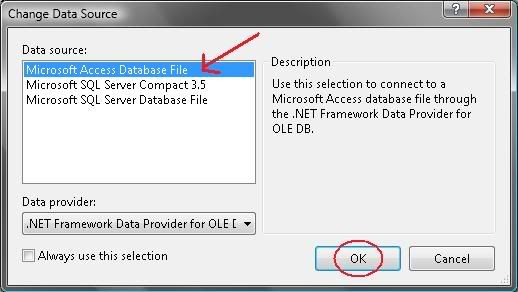
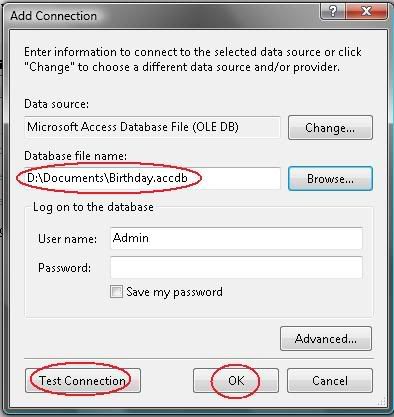
6) The Data Source has been changed to “Microsoft Access Database File (OLEDB)”. Now you need to load your database file to the project. To do this, click “Browse” and point to your database file then click OK to proceed. After all set up, you can click on “Test Connection” to check the connection status. Once you ready, continue to next step by clicking OK button. (see picture below)
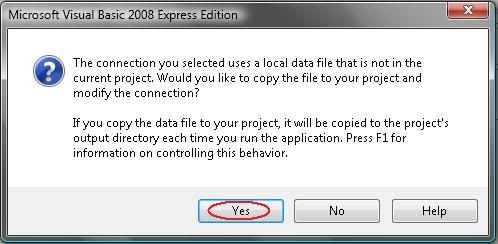
7) You might see this pop up message, just click YES to copy your database file into project folder. From here, just click on “NEXT” button until you reach the part as seen in the picture in STEP 8
8) Make sure the “Tables” is checked and click “Finish” to proceed to the next step.
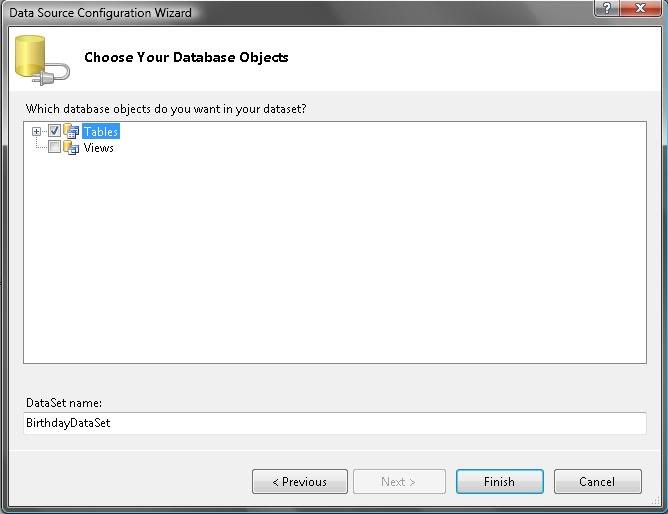
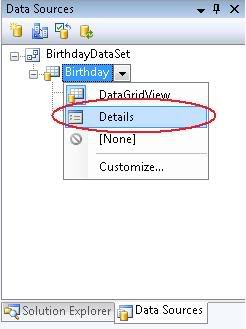
9) Now back to Data Sources window, left click Birthday Table and choose “Details” (see picture below)
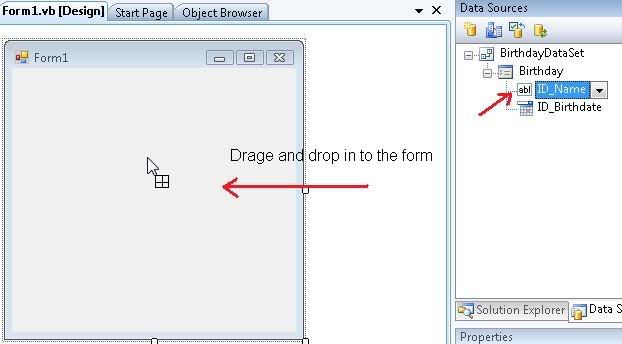
10) Final step in this tutorial. While holding mouse left click on the icon beside “ID_Name”, drag and drop it to the form. Do the same way for “ID_Birthdate”.
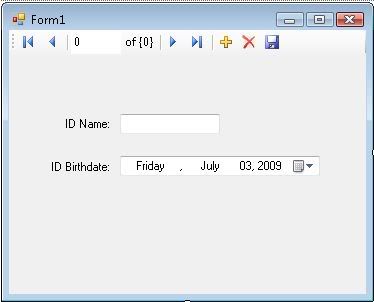
Finally, your form might look like this picture below. To navigate through the records in your database, use navigation button on top of the form. You can also execute : Add and Remove command. Press F5 to run the program. (Tips: to see larger picture size, right click on pictures and choose “view image”)
GetAsyncKeyState API Definition
0I was wondering about a way to get the keyboard strokes & read them. This windows api can be used from all sorts of keylogger hacking tricks to useful shortcut keys in an OS that you would like to define. here is a small code snippet with explanation:
This snippet shows the user how to get the key pressed. That is if the user presses control key that key is identified. Using this we can develop applications with greater flexibility. For example we can make an application to close if a key is pressed and so on.
This code is basically a smaller one with greater potential. It just contains three lines of code.
Public Declare Function GetAsyncKeyState Lib "user32" (ByVal vKey As Long) As IntegerOn Error Resume Next
'To check wheteher Control key is pressed
If GetAsyncKeyState(17) Then
msgbox "Control key pressed"
End IfVB.NET: How to sort listview by clicked column
3One of my favorite .NET control is the ListView. It is very useful for displaying multiple records on a spreadsheet format. Column sorting is one the feature of spreadsheet applications that most of end-users are used to. Unfortunately, this is not readily available as property in VB.NET. The ListView Sorting property only sorts items and not the sub-items so it can’t be use if we want to allow the user to sort your list by any clicked column.
To make your ListView application capable of column sorting, follow these steps:
1. On your existing project, add a new class with following code:
Imports System.Collections
Public Class clsListviewSorter
 Implements System.Collections.IComparer ' Implements a comparer Implements IComparer
 Private m_ColumnNumber As Integer
 Private m_SortOrder As SortOrder
 Public Sub New(ByVal column_number As Integer, ByVal sort_order As SortOrder)
 m_ColumnNumber = column_number
 m_SortOrder = sort_order
 End Sub
 ' Compare the items in the appropriate column
 Public Function Compare(ByVal x As Object, ByVal y As Object) As Integer Implements IComparer.Compare
 Dim item_x As ListViewItem = DirectCast(x, ListViewItem)
 Dim item_y As ListViewItem = DirectCast(y, ListViewItem)
 ' Get the sub-item values.
 Dim string_x As String
 If item_x.SubItems.Count <= m_ColumnNumber Then
 string_x = ""
 Else
 string_x = item_x.SubItems(m_ColumnNumber).Text
 End If
 Dim string_y As String
 If item_y.SubItems.Count <= m_ColumnNumber Then
 string_y = ""
 Else
 string_y = item_y.SubItems(m_ColumnNumber).Text
 End If
 ' Compare them.
 If m_SortOrder = SortOrder.Ascending Then
 If IsNumeric(string_x) And IsNumeric(string_y) Then
 Return (Val(string_x).CompareTo(Val(string_y)))
 ElseIf IsDate(string_x) And IsDate(string_y) Then
 Return (DateTime.Parse(string_x).CompareTo(DateTime.Parse(string_y)))
 Else
 Return (String.Compare(string_x, string_y))
 End If
 Else
 If IsNumeric(string_x) And IsNumeric(string_y) Then
 Return (Val(string_y).CompareTo(Val(string_x)))
 ElseIf IsDate(string_x) And IsDate(string_y) Then
 Return (DateTime.Parse(string_y).CompareTo(DateTime.Parse(string_x)))
 Else
 Return (String.Compare(string_y, string_x))
 End If
 End If
 End Function
End Class
2. Declare a private variable on the form where the listview you want to be sorted is located.
Private m_SortingColumn As ColumnHeader
3. Then on the listview’s ColumnClick event, add the following code
Private Sub ListView1_ColumnClick(ByVal sender As Object, ByVal e As System.Windows.Forms.ColumnClickEventArgs) Handles ListView1.ColumnClick
 ' Get the new sorting column.
 Dim new_sorting_column As ColumnHeader = ListView1.Columns(e.Column)
 ' Figure out the new sorting order.
 Dim sort_order As System.Windows.Forms.SortOrder
 If m_SortingColumn Is Nothing Then
 ' New column. Sort ascending.
 sort_order = SortOrder.Ascending
 Else ' See if this is the same column.
 If new_sorting_column.Equals(m_SortingColumn) Then
 ' Same column. Switch the sort order.
 If m_SortingColumn.Text.StartsWith("> ") Then
 sort_order = SortOrder.Descending
 Else
 sort_order = SortOrder.Ascending
 End If
 Else
 ' New column. Sort ascending.
 sort_order = SortOrder.Ascending
 End If
 ' Remove the old sort indicator.
 m_SortingColumn.Text = m_SortingColumn.Text.Substring(2)
 End If
 ' Display the new sort order.
 m_SortingColumn = new_sorting_column
 If sort_order = SortOrder.Ascending Then
 m_SortingColumn.Text = "> " & m_SortingColumn.Text
 Else
 m_SortingColumn.Text = "< " & m_SortingColumn.Text
 End If
 ' Create a comparer.
 ListView1.ListViewItemSorter = New clsListviewSorter(e.Column, sort_order)
 ' Sort.
 ListView1.Sort()
 End Sub
There you have it, test your listview application and it should be sorting by the column clicked.


